Installing SonarQube on Mac OS X - Checking C# Coding Conventions for Unity
[f:id:kenzo0107:20140620233131p:plain]
Environment
- Mac OS X 10.9.3 (Marvericks)
- SonarQube 4.3.1
- SonarRunner 2.4
Overview
- We will install a management tool for checking C# coding conventions.
Installation Steps
(1) Download SonarQube and SonarRunner
Please download SonarQube and SonarRunner from the official SonarQube site below.
- You can place the folders anywhere you like.
http://www.sonarqube.org/downloads/
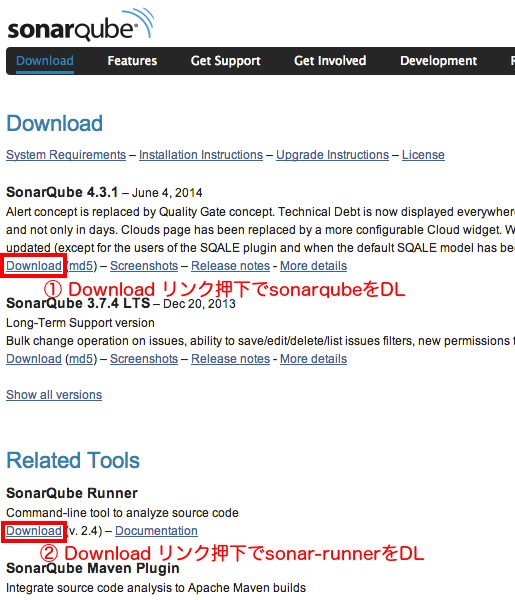
* As of 2014.06.20, I have confirmed that SonarQube 4.2 with MySQL 5.6 does not start.
Installing via Homebrew may download an older version of the application,
and there are cases where proper operation cannot be guaranteed.
(2) Install MySQL on macOS
The following blog was very easy to understand.
http://blog.hyec.jp/2014/02/mac-os-x-mavericksmysql.html
Just to be safe, here is the point to watch out for!
1 | ... |
A password file is created based on the password you entered above.
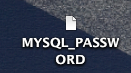
- By the way, I entered “seaside99” (Kujukuri Beach).
When you open the file, you will see a garbled-looking string instead of “seaside99”,
but this is the password for the root account.
[f:id:kenzo0107:20140621002405p:plain]
Were you able to complete the MySQL installation?
Run the following to start MySQL.
1 | sudo /usr/local/mysql/support-files/mysql.server start |
(3) Create a Database for SonarQube
- Run the following to log in to MySQL
1 | /usr/local/mysql/bin/mysql -u root -p(MYSQL_PASSWORD記載のパスワード) |
- Create the “sonar” database
Run the following to create the database “sonar”
- Create the “sonar” database
1 | CREATE DATABASE sonar; |
Run the following to confirm that “sonar” has been added to the databases.
1 | SHOW databases; |
Execution result
1 | mysql> SHOW databases; |
- Create the “sonar” user and grant all privileges
- Create a user with ID: sonar, PW: sonar
1 | CREATE USER 'sonar'@'localhost' IDENTIFIED BY 'sonar'; |
- Grant all privileges to the sonar user
1 | GRANT ALL PRIVILEGES ON sonar.* TO 'sonar'@'localhost'; |
- Apply the privileges
1 | FLUSH PRIVILEGES; |
- The configuration is complete, so we are done
1 | mysql> exit; |
(4) Edit sonar.properties
1 | vim (SonarQubeのパス)/conf/sonar.properties |
- The “4.2” directory is the version, so change it when you upgrade.
Since the following is the MySQL DB setting that Sonar references, uncomment “sonar.jdbc.url” to enable it.
1 | # Comment the embedded database and uncomment the following line to use MySQL |
(5) Edit sonar-runner.properties
1 | vi (Sonar-Runnerのパス)/conf/sonar-runner.properties |
For the following DB settings and account information that SonarRunner references, uncomment them to enable.
1 | #Configure here general information about the environment, such as SonarQube DB details for example |
After completing the above configuration,
start SonarQube.
1 | $ (SonarQubeパス)/bin/macosx-universal-64/sonar.sh console |
Now MySQL and SonarQube are both up and running.
(6) Configure Plugins in SonarQube
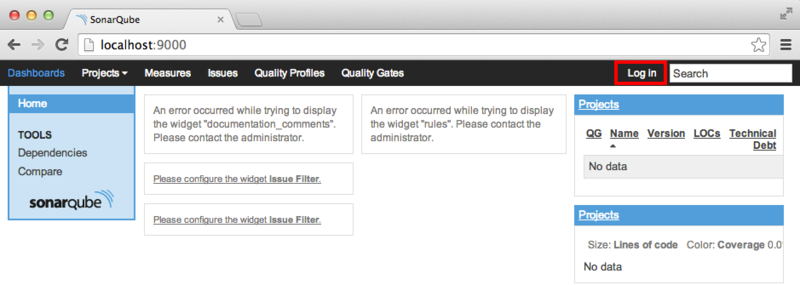
- Access the following URL
[http://localhost:9000]
- Access the following URL
A page like the one below will be displayed.
Click the Login link in the upper right.
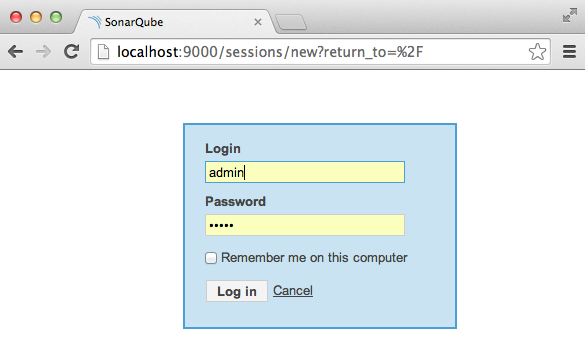
- Log in
Login : admin
Password : admin
- Log in
- Configure the plugins for checking conventions
Click the Setting link.
- Configure the plugins for checking conventions

The settings page will be displayed.
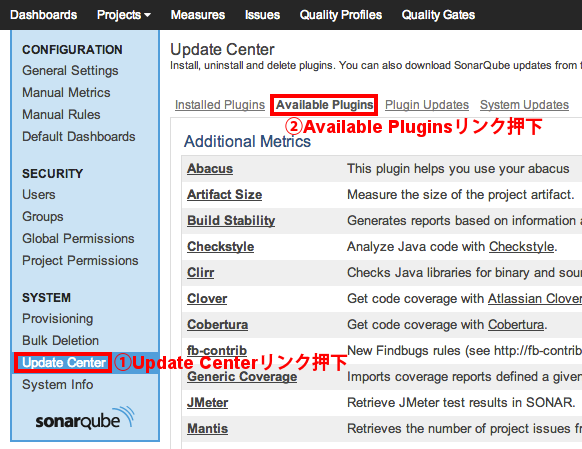
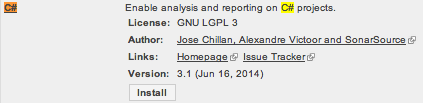
Install the plugins.
- C#
- ReSharper
- StyleCop
- Japanese Pack
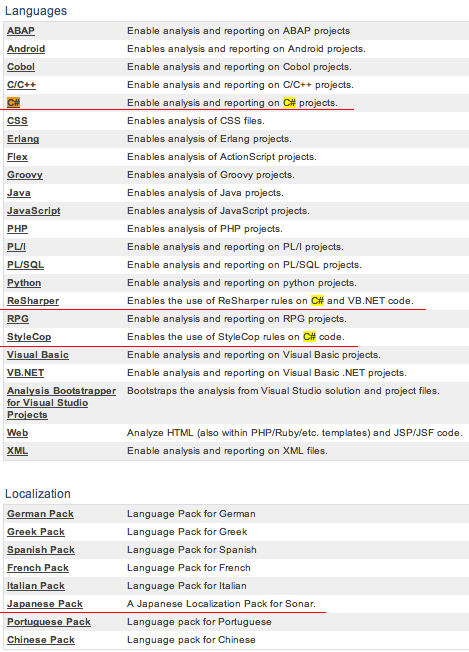
Click each link and then click the install button
Once you have installed all of the above plugins, the screen will look like this.
At this state, the installation is not yet complete.
You need to restart SonarQube once.
In the terminal where you ran “sonar.sh console”,
press Ctrl+C once to stop SonarQube, and the following result will be output.
1 | wrapper | INT trapped. Shutting down. |
Run “sonar.sh console” again
and access SonarQube
Update Center > Installed Plugins
You can confirm that the plugins from earlier have been installed.
- They are localized in Japanese.
[f:id:kenzo0107:20140622015442p:plain]
(7) Decide on the Project to Check for Coding Conventions
As an example, let’s say a Unity project is located as follows.
~/Desktop/UnityProject/
Create “sonar-project.properties” in the same directory level.
1 | $ vim sonar-project.properties |
Enter the following content.
- sonar.sources = (specify the path where the Unity .cs files are stored)
1 | # Project identification |
(8) Run SonarRunner
As an example, let’s say SonarRunner is located as follows.
~/Desktop/sonar-runner-dist-2.4/
In the same directory where you created sonar-project.properties,
run sonar-runner
1 | ~/Desktop/sonar-runner-dist-2.4/bin/sonar-runner |
If the following is displayed in the terminal, it succeeded
1 | INFO - 37/37 source files analyzed |
When you access SonarQube, the Projects section will show
a link with the sonar.projectName specified in sonar-project.properties,
so click that link
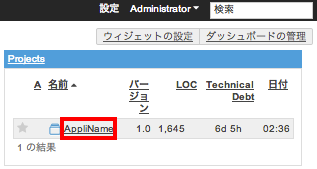
The coding convention check will be displayed.

Once you have gotten this far, the rest is about customizing the conventions.
That concludes this article.
For customization, go to the menu
Quality Profiles > Sonar Way
and try changing the settings.
Supplementary Notes
I originally tried to install this in order to check C# coding conventions for Unity,
but it has a very broad coverage, supporting not only C# but also Java, PHP, Python, and more.
Other blogs mostly cover Windows, and the recommended environment is Windows,
but this article summarizes how to use it on Mac OS X.
A Jenkins plugin [Sonar Plugin] is also available,
allowing periodic checks and triggering in combination with other jobs.