Building and Operating a Site with the GKE Tutorial
Overview
I previously built the Toco-chan Bus app on a Sakura VPS.

The Sakura VPS hosted several personal projects, but since some of them were
discontinued, I moved the Toco-chan Bus app over to GCP.
I’ve put together a fresh write-up of that experience, doubling as a GKE tutorial.
Why GCP?
The Toco-chan Bus app is a lightweight site that doesn’t even have a database.
Because of that, I figured I could use GCP’s free tier, which led to the migration.
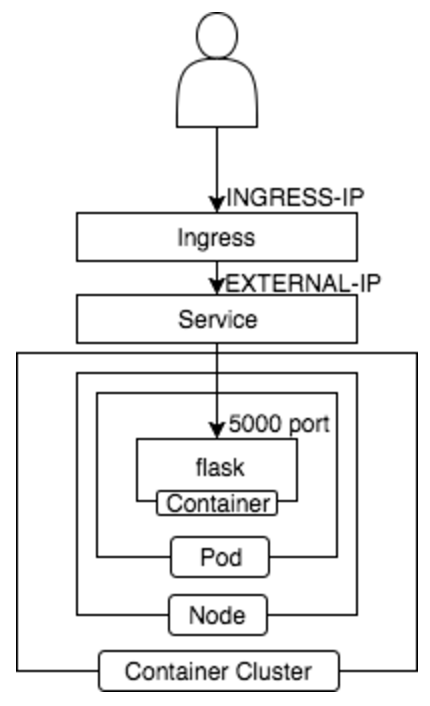
Architecture
On GCP, I’m using a Container Cluster, with an architecture like the following.
Below, I’ve summarized the build steps following GCP’s tutorial.
gcloud Default Configuration
Please refer to the article from when I previously built this using the free tier.
It’s a lonely single-Pod setup, but bear with me.
Creating the Container Cluster
As with the previous article, in order to use the free tier
I first create the cluster with 3 nodes and then reduce it to 1 node once it’s done.
I specified cluster version 1.7.2. ((As of August 2, 2017, the latest cluster version was 1.7.2))
1 | $ gcloud container get-server-config |
Fetching server config for us-west1-b
defaultClusterVersion: 1.6.7
defaultImageType: COS
validImageTypes:
- CONTAINER_VM
- COS
- UBUNTU
validMasterVersions:- 1.7.2
- 1.6.7
validNodeVersions:- 1.7.2
- 1.7.1
- 1.7.0
- 1.6.7
- 1.6.6
- 1.6.4
- 1.5.7
- 1.4.9
- Create the container cluster
1 | $ gcloud container clusters create tocochan-cluster-free \ |
- Set the node count to 1
1 | $ gcloud container clusters resize tocochan-cluster-free --size=1 |
- Verify
1 | $ gcloud container clusters describe tocochan-cluster-free | grep currentNodeCount |
currentNodeCount: 1
We can confirm that the current node count is 1.
And with that, it’s on the free tier!
After creating the cluster, I obtain the container cluster’s credentials so that
I can connect to and operate the cluster with kubectl.
1 | $ gcloud container clusters get-credentials tocochan-cluster-free |
Registering with the Container Registry
I create an image from a container started locally and
register it with the Container Registry, GCP’s private Docker repository.
I use the following repository.
https://github.com/kenzo0107/toda-tocochan-bus
- Start the Docker container
1 | $ git clone https://github.com/kenzo0107/toda-tocochan-bus |
- Create an image from the running Docker container and push it to GCR ((The project ID is “mametsubuservice-175801”))
1 | $ container_id=$(docker ps | grep [f]lask | awk '{print $1}') |
Deploying a Single Pod, as Tutorial ①
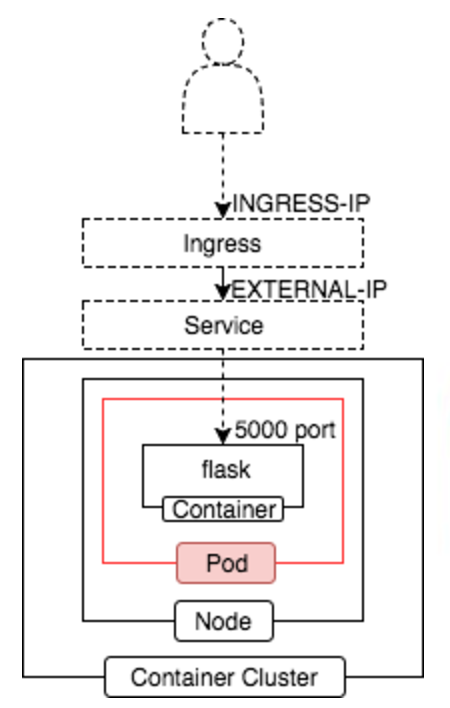
Deploying a single Pod on its own is rarely done in practice.
That’s simply because there’s no way to manage cases such as a container inside the Pod stopping abnormally.
This time, it’s a tutorial exercise for the sake of free-tier operation and understanding the concepts.
- pod.yaml
1 | apiVersion: v1 |
Running the Single-Pod Deployment
1 | $ kubectl create -f pod.yaml |
Checking the Pod Status
1 | $ kubectl get pods |
- Access configuration
flask starts on port 5000.
1 | $ kubectl port-forward tocochan 5000 |
- Access
http://localhost:5000from a browser
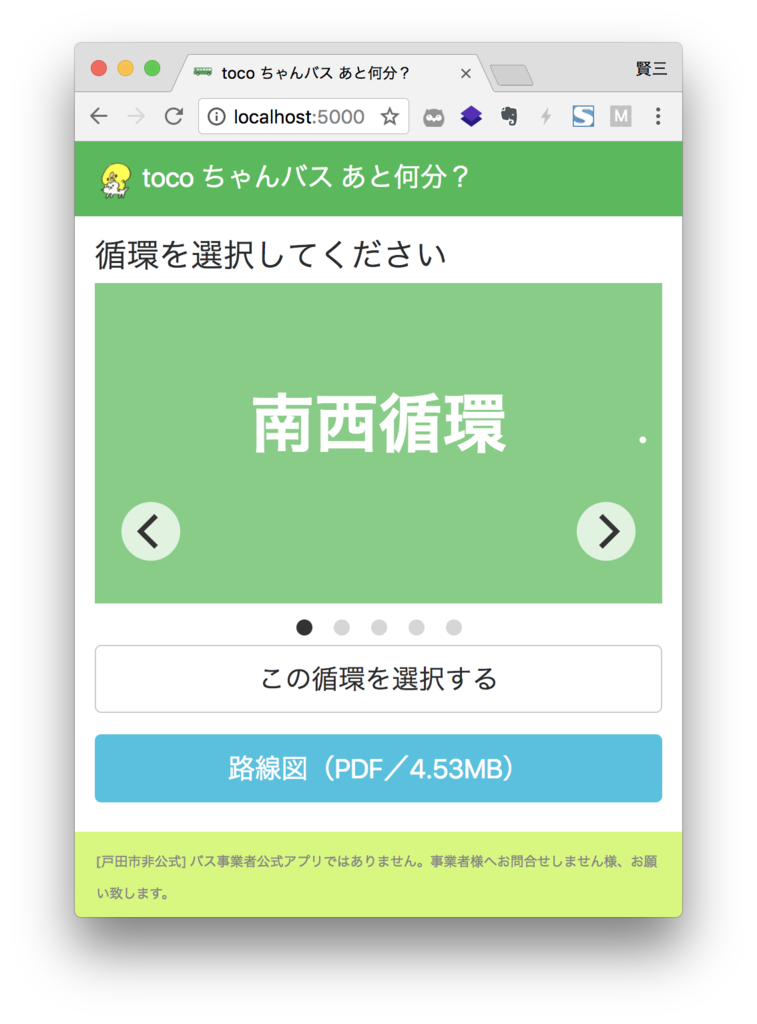
You can confirm that the top page is retrieved.
Deleting by Specifying the Pod Name
Now that we’ve confirmed the single-Pod deployment, let’s delete it.
1 | $ kubectl delete pods tocochan |
ReplicaSet Deployment, as Tutorial ②
When you create a single Pod on its own, nothing in particular is recovered even if the Pod stops abnormally.
A ReplicaSet always manages the number of containers that should be running normally and,
if there’s an abnormal stop, it adds a new Pod.
This too is written as a tutorial. I’ll delete it once I’m done.
- replicaset.yaml
1 | apiVersion: extensions/v1beta1 |
Running the ReplicaSet Deployment
1 | $ kubectl create -f replicaset.yaml |
Checking the ReplicaSet
1 | $ kubectl get rs -l name=tocochan |
NAME DESIRED CURRENT READY AGE
tocochan-4006188167 1 1 1 10m
What Happens If We Try to Delete the Pods?
1 | $ kubectl delete pods -l name=tocochan |
You can see that the number of running containers never drops to 0; instead, new ones are created.
NAME READY STATUS RESTARTS AGE
tocochan-14s3b 1/1 Running 0 4s
tocochan-tsvfn 1/1 Terminating 0 5m
Deleting the ReplicaSet
1 | $ kubectl delete rs tocochan |
Deployment Deploy
A ReplicaSet deployment leaves no history on k8s.
A Deployment deploy keeps a history, and if there’s a problem with the current version
you can easily roll the version back.
The Deployment deploy is what solves the problems we’ve seen so far.
- deployment.yaml
1 | apiVersion: apps/v1beta1 |
Running the Deployment Deploy
Adding --record lets you keep a history of operations.
By keeping a history, you can use kubectl operations to roll back to a past version if there’s a problem.
1 | $ kubectl create -f deployment.yaml --record |
Checking the Deployment
1 | $ kubectl get deployments -l name=tocochan |
NAME DESIRED CURRENT UP-TO-DATE AVAILABLE AGE
tocochan 1 1 1 1 10m
Checking the ReplicaSet
1 | $ kubectl get rs -l name=tocochan |
NAME DESIRED CURRENT READY AGE
tocochan-2006588533 1 1 1 10m
Checking the Pod
1 | $ kubectl get pods -l name=tocochan |
NAME READY STATUS RESTARTS AGE
tocochan-4006188167-3zrn9 1/1 Running 0 10m
Checking the Deploy Result
1 | $ kubectl rollout status deployment/tocochan |
deployment “tocochan” successfully rolled out
We can see that the rollout was published correctly.
Checking the History
1 | $ kubectl rollout history deployment tocochan |
deployments “tocochan”
REVISION CHANGE-CAUSE
1 kubectl create –filename=deployment.yaml –record=true
Editing
1 | $ kubectl edit deployment tocochan |
vim launches and you can edit the deployment.
1 | - image: gcr.io/mametsubuservice-175801/tocochan:latest |
When you edit as above, save, and exit,
NAME READY STATUS RESTARTS AGE
tocochan-1297744065-2qb87 1/1 Terminating 0 15m
tocochan-4006188167-3zrn9 1/1 Running 0 10s
you can see that the existing container is being stopped and a new container has been started.
- Check the history
1 | $ kubectl rollout history deployment tocochan |
REVISION CHANGE-CAUSE
1 kubectl create –filename=all.yaml –record=true
2 kubectl edit deployment tocochan
Checking the rollout history shows that the edit has been added.
Rolling Back the Version
Roll back to REVISION 1.
1 | $ kubectl rollout undo deployment tocochan --to-revision=1 |
1 | $ kubectl get pods -l name=tocochan |
NAME READY STATUS RESTARTS AGE
tocochan-1297744065-2qb87 1/1 Terminating 0 6m
tocochan-4006188167-zswcj 1/1 Running 0 7s
Just like before, you can see the existing container stopping and a new container starting up.
Can We Connect from Outside?
With the Pod in the state we’ve reached so far, run the following command.
1 | $ kubectl get svc |
NAME CLUSTER-IP EXTERNAL-IP PORT(S) AGE
kubernetes 10.3.240.1443/TCP 3h
Other than kubernetes having a cluster-ip assigned, no IP is assigned in particular,
so it’s in a state where it can’t be accessed from outside.
We need to configure it so that it can be accessed from outside.
Creating a Service
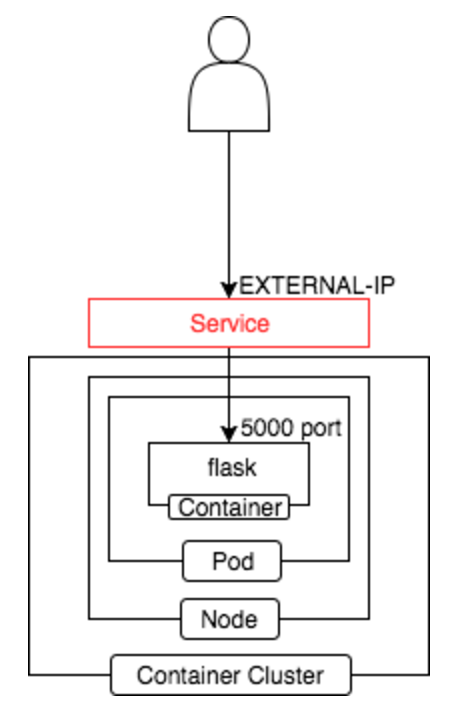
We set up an external-facing IP and route so that the Pod can be accessed from outside.
- service.yaml
1 | apiVersion: v1 |
Creating the Service
1 | $ kubectl create -f service.yaml |
Checking the Service
1 | $ kubectl get svc |
After a few minutes, it changes from
NAME CLUSTER-IP EXTERNAL-IP PORT(S) AGE
kubernetes 10.3.240.1443/TCP 10m
tocochan 10.3.240.70 xx.xxx.xxx.xxx 5000:32429/TCP 10m
You can confirm that the web page is accessible with the following command.
1 | $ curl -v http://$EXTERNAL-IP:5000 |
Creating a Load Balancer
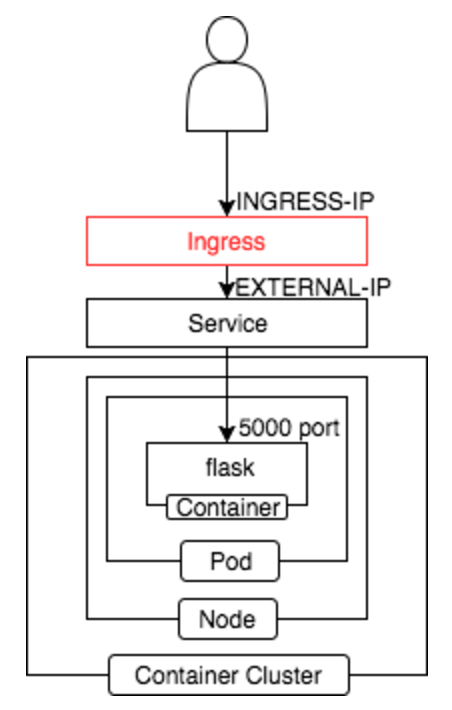
It’s possible to set up a load balancer.
It receives on port 80 and forwards to port 5000 on the backend.
- ingress.yaml
1 | apiVersion: extensions/v1beta1 |
Creating the Ingress
1 | $ kubectl create -f ingress.yaml |
Checking the Ingress
1 | $ kubectl get ingress tocochan |
NAME HOSTS ADDRESS PORTS AGE
tocochan * yy.yyy.yy.yy 80 10m
You can see that accessing it as below yields the same result as the curl -v http://$EXTERNAL-IP:5000 we ran earlier.
1 | $ curl http://$INGRESS_IP/ |
Consolidating the Config Files
1 | $ echo '---' > hyphen.txt; \ |
- all.yaml
1 | apiVersion: apps/v1beta1 |
From here on, the following command is all you need!
1 | $ kubectl create -f all.yaml --record |
Obtaining a Domain
toda-tocochan-bus.tk is a free domain obtained at freenom,
with the Ingress IP set and published.
Overall Assessment
The flow of developing locally and then deploying has become truly easy.
I really felt that kubernetes contributes greatly to carrying out the philosophy of containers.
That’s all.
I hope this is helpful.