気持ちを抑えられずありがちなタイトルを付けました。
サーバ負荷監視時のボトルネックの特定をする為、
サーバに接続し辛い
ブラウザから URL を打ち込みサイトにアクセスするもページが表示されない
API が timeout する
上記の様な事象が発生した場合は
その監視グラフを元に
以下、出来るだけ原理を知る上で CLI を元に話を進めていきます。
サーバに CPU 負荷を掛ける CPU 負荷を掛けるツールとしてLinux の I/O や CPU の負荷とロードアベレージの関係を詳しく見てみる のスクリプトを拝借しました。
loadtest.pl
arg1: 並列実行するプロセス数
arg2: システムコールするプログラムを動作させるか判定
1 2 3 4 5 6 7 8 9 10 11 12 13 14 15 16 my $nprocs = $ARGV[0 ] || 1 ;for ( my $i=0 ; $i<$nprocs; $i++ ){ my $pid = fork ; die $! if ( $pid < 0 ); if ( $pid == 0 ){ while (1 ){ if ( $ARGV[1 ] ){ open (IN, ">/dev/null" ); close (IN); } } } } wait ;
ロードアベレージを 2 に近づける様に CPU 負荷を掛ける
1 2 $ chmod +x ./loadtest.pl $ ./loadtest.pl 2
CPU 使用状況確認コマンド
リアルタイム監視 → top, vmstat
過去確認 → sar
リアルタイム監視 top で概要確認1 2 3 4 5 6 7 8 9 10 11 12 13 top - 12:12:39 up 592 days, 18:55, 4 users , load average: 1.97, 1.13, 0.46 Tasks: 125 total, 3 running, 122 sleeping, 0 stopped, 0 zombie Cpu(s): 99.7%us, 0.2%sy, 0.0%ni, 0.0%id , 0.0%wa, 0.0%hi, 0.0%si, 0.2%st Mem: 1020052k total, 943132k used, 76920k free, 144136k buffers Swap: 2097148k total, 466724k used, 1630424k free, 410784k cached PID USER PR NI VIRT RES SHR S %CPU %MEM TIME+ COMMAND 29955 mameko_d 20 0 25196 520 184 R 99.9 0.1 4:04.91 loadtest.pl 29956 mameko_d 20 0 25196 516 180 R 99.5 0.1 4:04.86 loadtest.pl 24534 apache 20 0 425m 25m 7480 S 0.3 2.6 1:42.63 httpd 1 root 20 0 19232 412 224 S 0.0 0.0 0:01.77 init ... ...
上記結果から
Load Average が上昇している
%CPU, COMMAND から上昇の原因は loadtest.pl
暫定的な対処としてはこのプロセスを kill することで負荷を止めることができます。
1 2 $ kill -9 6528 $ kill -9 6529
処理途中でプロセスを kill してしまい不整合が発生する様な処理の場合は
CPU 使用率高いランキング Top10 表示 1 $ ps ax --sort =-%cpu -o command ,pid,pid,%cpu|head -n 11
※ -n 11 なのは 1 行目はカラム名が入る為
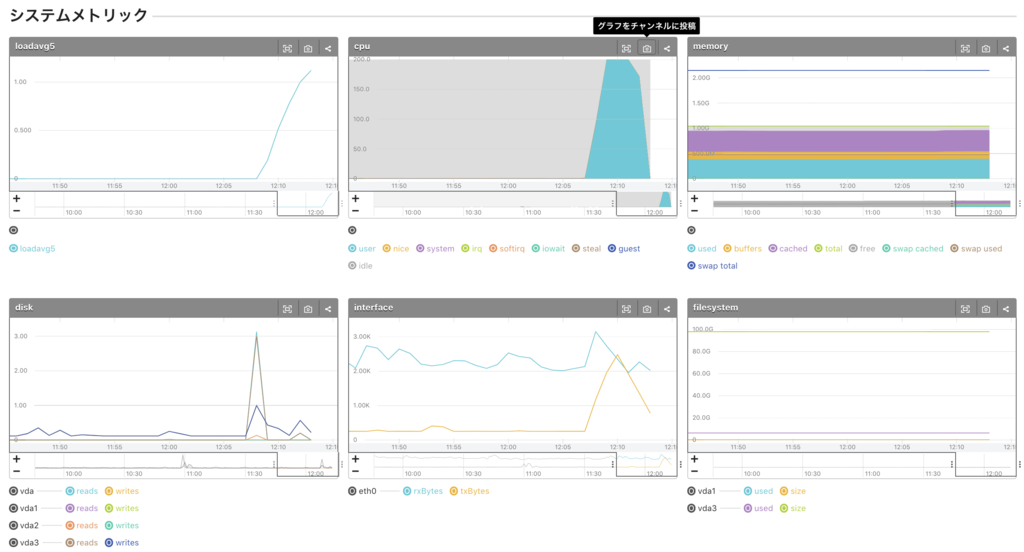
グラフで見る これまで CLI で確認した考察の答え合わせとして確認しましょう。
loadavg5 急上昇
CPU user 急上昇。 CPU system はそこまで上がっていない。
memory は消費していない
top コマンドの様にどのプロセスが原因かまではグラフからは不明です。
補足 ちなみにCOMMAND に httpd と表示されます。fluentd は ruby で実行されているので ruby です。
PID USER PR NI VIRT RES SHR S %CPU %MEM TIME+ COMMAND
vmstat で CPU 使用率確認1 秒ごとに出力
1 2 3 4 5 6 7 8 9 10 11 12 13 14 15 16 17 18 19 20 21 22 23 24 $ vmstat 1 procs -----------memory---------- ---swap-- -----io---- --system-- -----cpu----- r b swpd free buff cache si so bi bo in cs us sy id wa st 0 0 515396 80756 37120 220320 0 0 12 2 0 0 0 0 100 0 0 0 0 515396 80756 37120 220320 0 0 0 0 110 200 0 0 100 0 0 0 0 515396 80756 37120 220320 0 0 0 0 103 205 0 0 100 0 1 0 0 515396 80632 37120 220320 0 0 0 0 121 212 0 0 99 0 0 0 0 515396 80632 37120 220320 0 0 0 0 114 216 0 0 100 0 0 2 0 515328 80648 36944 220432 0 0 0 0 2092 237 100 0 0 0 0 2 0 515328 80648 36944 220432 0 0 0 0 2071 224 100 0 0 0 0 2 0 515328 81020 36952 220432 0 0 0 0 2162 381 100 1 0 0 0 2 0 515328 80896 36952 220432 0 0 0 0 2164 266 100 0 0 0 0 2 0 515328 80756 36952 220432 0 0 0 0 2139 308 100 0 0 0 0 2 0 515328 80772 36952 220432 0 0 0 0 2111 237 100 0 0 0 0 2 0 515328 80772 36952 220432 0 0 0 0 2087 238 100 0 0 0 0 2 0 515328 80772 36952 220432 0 0 0 0 2077 237 100 0 0 0 0 2 0 515328 80772 36952 220432 0 0 0 0 2076 232 99 1 0 0 0 2 0 515328 80772 36952 220432 0 0 0 0 2078 235 100 0 0 0 0 2 0 515328 80904 36952 220432 0 0 0 0 2081 231 85 0 0 0 15 0 0 515328 81448 36952 220432 0 0 0 0 267 254 6 0 94 0 0 0 0 515328 81448 36952 220432 0 0 0 0 151 250 0 0 99 0 0 0 0 515328 81448 36952 220432 0 0 0 0 230 307 0 0 99 0 0 0 0 515328 81456 36952 220432 0 0 0 0 123 230 0 0 100 0 0
上記から以下のことが確認できます。
./loadtest.pl 2 を実行中は procs r (実行中プロセス) = 2 となっているcpu us が 100%, cpu id が 0%
cpu id がなくなり、プログラムが 100% CPU を食いつぶしている
system in (割り込み回数)、system cs (コンテキストスイッチ回数) が増加
コンテキストスイッチ自体が CPU を食いシステムの負荷を上げている
過去確認 1 2 3 4 5 6 7 8 9 $ sar -u -s 21:00:00 -e 22:10:00 -f /var/log/sa/sa31 21:00:01 runq-sz plist-sz ldavg-1 ldavg-5 ldavg-15 21:10:01 0 200 0.00 0.04 0.07 21:20:01 0 203 0.00 0.00 0.01 21:30:01 0 203 0.00 0.00 0.00 21:40:01 0 211 0.00 0.03 0.00 21:50:01 0 210 0.65 0.82 0.37 Average: 0 205 0.13 0.18 0.09
sar コマンドは過去まで遡って確認できるので便利です。
sar -q 実行結果各項目
Item Explain
runq-sz
CPU を実行する為のメモリー内で待機中のカーネルスレッド数。
plist-sz
プロセスリストのプロセスとスレッド数
ldavg-1
過去 1 分間のロードアベレージ
ldavg-5
過去 5 分間のロードアベレージ
ldavg-15
過去 15 分間のロードアベレージ
システムコールを伴う CPU 負荷 ロードアベレージを 2 に近づける & システムコールする様に CPU 負荷を掛ける
vmstat で監視 1 2 3 4 5 6 7 8 9 10 11 12 13 14 15 16 17 18 19 20 21 22 23 24 25 26 27 $ vmstat 1 procs -----------memory---------- ---swap-- -----io---- --system-- -----cpu----- r b swpd free buff cache si so bi bo in cs us sy id wa st 0 0 597832 886856 3808 34844 0 0 12 2 0 0 0 0 100 0 0 1 0 597828 886856 3808 34908 0 0 0 0 134 233 1 0 99 0 0 0 0 597788 886684 3944 34876 20 0 156 0 238 307 1 1 96 4 0 0 0 597788 886684 3944 34904 0 0 0 0 109 219 0 0 100 0 0 2 0 597756 884044 3956 36296 96 0 1500 0 1075 1274 18 26 41 15 0 ← loadtest.pl 2 1 実行開始 2 0 597756 884044 3956 36296 0 0 0 0 2080 2265 42 58 0 0 0 2 0 597756 884076 3956 36296 0 0 0 0 2083 2458 41 60 0 0 0 2 0 597756 884200 3964 36292 0 0 0 32 2103 2458 42 59 0 0 0 2 0 597756 884200 3964 36296 0 0 0 0 2079 2588 41 60 0 0 0 3 0 597756 883952 3964 36296 0 0 0 0 2080 2209 40 60 0 0 1 2 0 597756 884216 3964 36296 0 0 0 0 2085 2395 42 58 0 0 0 2 0 597756 884216 3964 36296 0 0 0 0 2061 2399 43 57 0 0 0 3 0 597756 884092 3964 36296 0 0 0 0 2061 1991 44 57 0 0 0 2 0 597756 884216 3964 36296 0 0 0 0 2059 2333 42 58 0 0 1 2 0 597756 884216 3964 36296 0 0 0 0 2058 2211 42 58 0 0 1 2 0 597756 884092 3964 36296 0 0 0 0 2058 2461 43 58 0 0 0 2 0 597756 883844 3964 36296 0 0 0 0 2059 2641 42 58 0 0 0 2 0 597756 884216 3964 36296 0 0 0 0 2158 2715 42 59 0 0 0 ← loadtest.pl 2 1 実行終了 0 1 597744 884588 3964 36364 44 0 144 0 1995 2313 37 58 3 2 0 0 0 597724 884388 3964 36524 208 0 380 0 173 239 0 1 95 5 0 0 0 597724 884388 3964 36568 0 0 0 0 102 196 0 0 100 0 0 0 0 597636 884388 3964 36568 0 0 0 0 102 203 0 0 100 0 0 0 0 597636 884512 3964 36568 0 0 0 0 104 195 0 0 100 0 1
loadtest.pl からシステムコールが多数実行される為、cpu sy 上昇している。
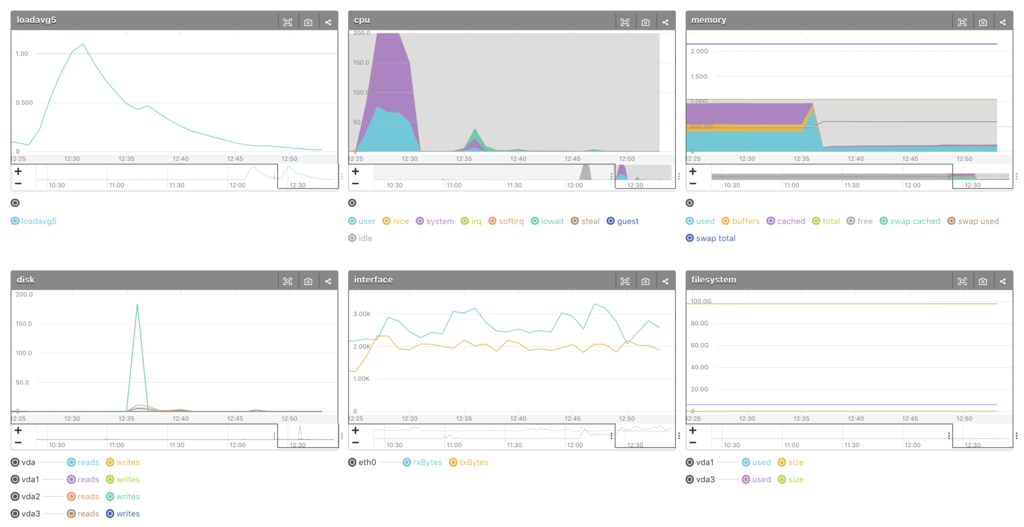
グラフで見る
12:25 辺りから負荷急上昇
loadavg5 急上昇
CPU user, system 共に急上昇。 system の割合が多い
memory は消費していない
対応例
アプリケーションの CPU 使用箇所の特定
datadog, NewRelic 等の APM(Aplication Performance Management) 導入しアプリケーションのボトルネック抽出し修正
CPU 増設
対象アプリのプロセスを kill (先ほどの プロセス kill )
例)管理画面で集計処理し、DB に負荷掛けサービスに影響してしまった時に集計処理のプロセスを kill
サーバにメモリ負荷を掛ける 1 秒毎に 20MB 消費する様に設定
1 2 3 4 5 6 7 #!/usr/bin/perl while(1){ sleep 1; push @h , 1 x 1024 x 1024 x 20 } wait;
1 2 $ chmod +x ./memorytest.pl $ ./memorytest.pl
メモリ使用状況確認コマンド
リアルタイム → top -a, free
過去確認 → sar
残メモリ確認 top で概要確認もしくは top 実行後、 Shift + m
PID USER PR NI VIRT RES SHR S %CPU %MEM TIME+ COMMAND
上記結果から
%MEM, COMMAND から上昇の原因は memorytest.pl
暫定的な対処としては loadtest.pl と同様、プロセスを kill することで負荷を止めることができます。
free で残メモリ確認1 2 3 4 5 6 $ free total used free shared buffers cached Mem: 1020052 908664 111388 572 29764 204492 -/+ buffers/cache: 674408 345644 Swap: 2097148 517696 1579452
何度か実行すると徐々に Mem の
used 上昇free 減少free 減少に引っ張られて buffers, cached 減少
free 実行結果各項目
Item Explain
shared
プロセス間で共有できる領域用メモリ
buffers
buffer に利用されるメモリ
cached
ページキャッシュ用メモリ
確認観点 上記 free コマンド実行結果から解放されたメモリは
1 Mem free 111388 kB = 108 MB
これだけでは 108 MB が残りと思いがちですがbuffer と cache に利用して disk I/O を軽減している為、
実質、残メモリはどこ見れば良い? free + buffers + cached-/+ buffers/cache free
以上から-/+ buffers/cache free 確認 or スラッシングを確認します。
Swap 発生は何を見ればわかる? vmstat 実行してスラッシングが発生しているか確認
スラッシング確認方法
si (swap in from disk), so (swap out to disk) が多発している場合、スラッシングが発生しています
so が比較的高い場合、メモリ不足の可能性大
1 2 3 4 5 6 7 8 9 10 11 12 13 14 15 16 17 18 19 20 21 22 $ vmstat 1 procs -----------memory---------- ---swap-- -----io---- --system-- -----cpu----- r b swpd free buff cache si so bi bo in cs us sy id wa st 0 0 593244 211856 3704 34744 0 0 0 0 236 215 4 2 94 0 0 1 0 593244 211876 3704 34744 0 0 0 0 144 216 1 0 98 0 0 0 0 593244 160664 3704 34744 0 0 0 0 207 220 4 1 96 0 0 0 0 593244 109328 3704 34744 0 0 0 0 227 226 4 2 94 0 0 0 1 593052 58900 3704 33312 0 0 0 0 515 241 4 2 59 34 0 0 1 618460 55144 1224 15220 0 25416 0 25416 39357 528 5 24 34 37 1 ← ここで memorytest.pl 行開始 0 1 670408 56644 1160 13732 0 51948 0 51948 37384 644 7 22 34 37 1 1 1 671048 59256 456 12480 0 640 0 640 182 254 1 1 49 50 0 0 0 735892 72040 436 10088 0 64844 96 64844 14559 1044 3 15 67 15 0 0 0 786748 71436 436 9596 0 50856 124 50856 13678 745 4 13 69 14 1 0 2 830880 63556 436 9504 32 44144 320 44144 15659 636 5 13 54 28 0 0 3 849932 48976 436 8652 304 19168 1104 19168 6568 661 6 6 32 55 1 0 1 900916 71564 776 8264 88 50992 560 50992 9549 706 1 10 27 62 0 0 3 941292 64152 1308 9880 80 40380 2564 40380 10800 622 5 11 29 56 1 0 1 993108 69908 1700 10656 0 51820 2024 51852 10208 848 5 12 43 40 1 2 0 994168 71536 1700 10428 0 1060 0 1060 216 257 3 1 82 15 0 0 0 1045720 71384 1700 9456 0 51552 0 51552 5356 789 2 9 77 12 1 0 0 1096468 71468 1332 9012 0 50748 0 50748 15385 857 6 13 72 9 1
bo (block out to device) … ブロックデバイスに送られたブロック
bi (block in from device) … ブロックデバイスから受け取ったブロック
物理メモリ使用量(Resident Set Size)高いランキング Top10 表示 1 $ ps ax --sort=-rss -o command,pid,ppid,vsz,rss|head -n 11
グラフで見る
12:35 辺りからメモリ急上昇
cached 減、 used 増
対応例
プロセスレベルで監視
datadog, mackerel, prometheus, zabbix 等監視ツール導入
メモリ増設
対象アプリのプロセスを kill (先ほどの プロセス kill )
Disk I/O I/O ディスク利用状況 確認 1 2 3 4 5 6 7 8 9 $ sar -b -s 13:00:00 -e 14:00:00 -f /var/log/sa/sa31 13:00:01 tps rtps wtps bread/s bwrtn/s 13:10:01 0.28 0.01 0.27 0.11 2.90 13:20:01 0.28 0.00 0.28 0.05 2.99 13:30:01 0.22 0.00 0.22 0.00 2.30 13:40:01 0.24 0.00 0.24 0.00 2.50 13:50:01 0.23 0.00 0.23 0.03 2.35 Average: 0.25 0.00 0.25 0.04 2.61
sar -b 実行結果項目
Item Explain
tps
1秒あたりの転送 (デバイスに対する IO リクエスト) 数の合計
rtps
1秒あたりの読み込み IO リクエストの回数の合計
wtps
1秒あたりの書き込み IO リクエストの回数の合計
bread/s
1秒あたりの(ブロック単位)読み込み IO リクエストのデータ量の合計
bwrtn/s
1秒あたりの(ブロック単位)書き込み IO リクエストのデータ量の合計
確認観点 1 2 3 4 5 6 7 8 9 プロセスのメモリ消費量増 ↓ キャッシュにメモリが使えなくなる ↓ Disk I/O にメモリが使えなくなる ↓ Disk I/O 増加 ↓ I/O 待ちプロセス増加
対策 まとめ CPU, Memory 使用率が上昇する原理を知った上で監視をすると
本来はグラフから見ることになるかと思います。top, vmstat, sar を実行した時の数値の変化の仕方をイメージすると
以上
Reference 補足 Swap とは? カーネルがほぼ利用されていないメモリを検出して排除している状態を表示しています。
メモリの空きを入出力のバッファとキャッシュに使用
さらに活動が少ない部分をメモリから排除して swap へ押し出す
swap からバッファやキャッシュに転用
その為、 swap が発生している、といって慌てない。
Swap を利用する意義 メモリ不足でもメモリの一部をディスクに退避させて計算し続けることができます。仮想メモリ と言います。
スラッシングとは? 実メモリ と Swap のメモリの移動が大量発生し処理が遅延する現象です。
sar コマンドがない場合はインストール 1 2 3 4 5 // CentOS $ yum install -y sysstat // Ubuntu $ apt-get install -y sysstat